
| Battery | 72V Triangle pack from LunaCycles.com Panasonic GA cells |
| Controller | 40A Infineon (3300W) |
| Motor | Rear Mac 10t geared hubmotor |
| Battery | 72V Triangle pack from LunaCycles.com Samsung 25R cells |
| Controller | 60A ert 12 FET Sinewave Controller (5000W) |
| Motor | Rear Edge Direct Drive Hub Motor |
This is my Electric Enduro Bike (EEB) hub build. After my original geared hub setups, I was looking for more speed and torque and stepping upto 72V. First, I sourced a 72V battery with GA cells from Luna Cycle. It did not have super high performance cells, but I was only planning to run 40A or less. The output (Watts) is based on the Voltage and the Amps, so in this case I was targeting 84.4V (hot off the charger) x 40A = ~3376W. This would be quite a jump from the 2000 watt setups I had run so far.
In order to fit a 72V battery, I wanted to try an Ebike specific frame. The EEB has a large battery compartment, I mean huge! Here is a summary of the specs:

- Fairly slack head angle
- 200 mm travel!
I ordered the EEB frame and DNM fork and rear shock options from em3ev.com. I went with 24 x 3 inch wheels. I wanted to keep the wheel diameter smaller to improve torque, and also keep the standover height low since I’m height challenged…
I planned to ride it on the trails, but had difficulty finding offroad tires, so I went with Schwalbe Crazy Bob tires that I thought would be ok on the trails (they weren’t). Now that I had discovered RaceFace parts, I went on a shopping spree at Amazon to pick up the following:


I also stuck with Avid cable brakes, but this time I went with BB7 Disk Brakes front and rear, so I was pretty excited about this. My first opportunity to run disk brakes front and rear as well as full suspension.
Now, I had learned some bike assembly/maintenance from my first couple builds, but this time I was starting from a bare frame and fork. When I got the parts in hand and got to work, I realized that this setup was much better suited to a high-speed application. It had pinching rear dropouts that were very beefy, no need for additional torque arms here. Here is a composite image of the left and right sides.

You can see the “longitudinal” bolt that will lock the axle so it won’t come out. The dropout and swingarm are also very meaty. The right pic shows how the Mac motor wires come out through the hollow axle itself. This is not ideal for strength, and means we have to thread the wire through the axle nut, one of the reasons changing a tire with a hub motor is a pain in the ass (PITA)! In the current DD Edge hubmotor setup, the wires do not exit through the axle, so the axle can be solid and stronger and it’s slightly less of a PITA to change a flat.
The front is a 20 mm thru axle, my first experience with non QR hubs. After riding it, I decided I would try to use thru axles on all my future builds too. It feels very stout and solid with no flex. Below is an image of the build progress after a night or two. I was able to install the cranks into the bottom bracket with no issues. I was able to setup the rear shock, get the wheels mounted, brakes configured, etc.

I was having difficulty with the headset. I had never done it before, and was really baffled because there didn’t seem to be enough parts. The badly translated manual wasn’t that much help, but I reached back out to em3ev and it turned out I was missing parts! They shipped the missing parts out for free, but when you order something from China, it takes some time for the parts to arrive.

There was no way I could wait, so reached out to Foxboro Bike, a local bike shop (LBS) to help. This is a common piece of advice among Ebike DIYers, especially for certain specialty items like removing a bottom bracket or a headset. The guys at an LBS have the tools and expertise to do this in a few minutes, rather than us getting frustrated and potentially stripping something. Over time, I have been acquiring bike specific tools and skills, and have now assembled 3 or 4 headsets myself.
The owner was very nice and we chatted about how Ebikes were evolving. They were able to install a new headset and get the frame and fork assembled. He tried to setup the shocks as best he could, but considering these were low-end China parts he wasn’t that familiar with them. He did comment that this was the heaviest bike he had ever built, and it didn’t even have the battery installed!

I just had to finish getting the battery mounted and the other Ebike parts squared away: throttle, Cycle Analyst computer, controller, power switch, 3 speed switch, etc. I finished it the same night, and rolled it out for a few night pix. I was pretty happy with it.

I rode it around for a bit and it was definitely heavy. This was not going to be a nimble bike that would be ideal for single track. Without the motor, it was very difficult to get it going. On the positive side, the suspension was ludicrous. I could just hit a street curb square and it was just a little blip. I loved it. The disk brakes with 200mm rotors were awesome. Below is a pic from the cockpit, the Cycle Analyst (CA) lets you monitor various parameters and even adjust throttle, amps, etc. It’s old school and archaic looking, but functional.

After riding on the trails for a bit over the coming days, I realized the Schwalbe Crazy Bobs were not gonna cut it, so I switched to what has become my favorite brand: Maxxis. In this case, I found a site that had the High Roller rear tires in 24.x.3 and the Minion front tire in24x2.4. I love these tires. They are pretty aggressive and intended for downhill, which would be overkill where I ride. However, they work great since the motor makes everything seem like it’s downhill. 🙂 The extra grip is welcome and the durability helps avoid flats. Did I mention that changing a tire on a wheel with a hub motor is a PITA?
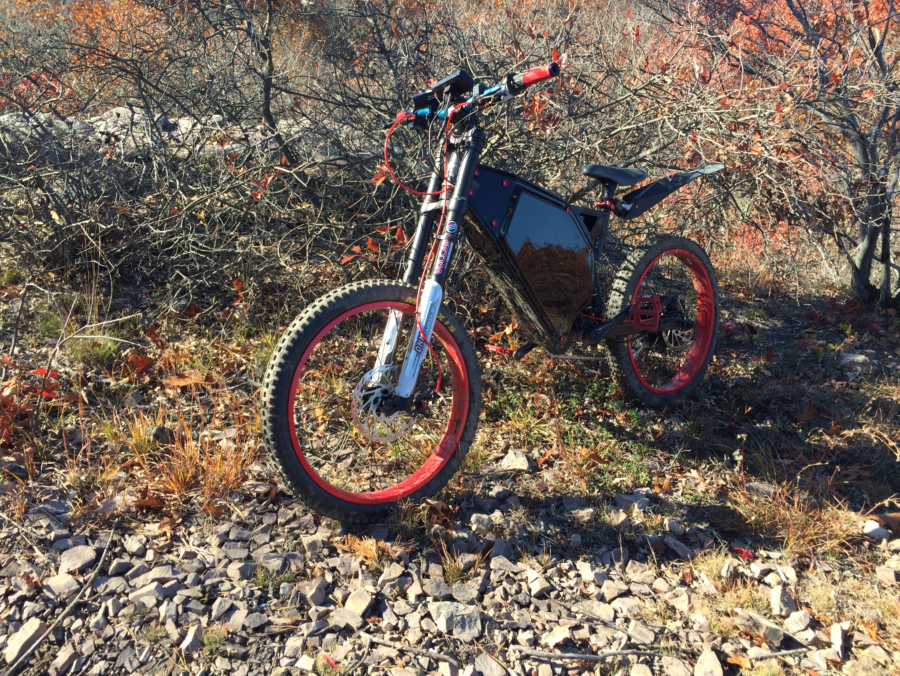
Here it was after a late fall ride through the muddy trails.

With the Mac geared hubmotor and the 72V battery, I was able to now hit speeds in the high 30s. There was definitely more torque too from the beefy battery with more volts and amps. However, the controller and motor would get very hot trying to run them at these levels and pushing this heavy-ass bike.
What I’ve found is Ebikes are never done. Like the Stumpjumper, this one evolved from the Mac geared hub motor to the current configuration with a Direct Drive Edge motor that you can read about in another article. This setup is cool, but my new plan is to convert it to a mid-motor setup in the near future.
Ebike Nerd built this blog with WordPress on AWS Lightsail. Ebike Nerd wanted an opportunity to try some AWS Components including Route 53, SES, and S3. Subscribe to get email updates when we post new content and please let me know if you have any questions or other feedback.
| Disclaimer: There are affiliate links on this site and I may receive compensation if you use a link and make a purchase. I only reference products that I have used or if someone I trust has recommended them. Product reviews and information on this site are meant to provide food for thought, not professional advice. I share my experiences to show what worked so far and what didn’t, YMMV. Please check your local laws to make sure you are in compliance, or at least don’t get caught! |