
| Battery | 48V Dolphin pack from em3ev.com |
| Controller | 40A Infineon (2000W) |
| Motor | Rear Mac 8T geared hubmotor |
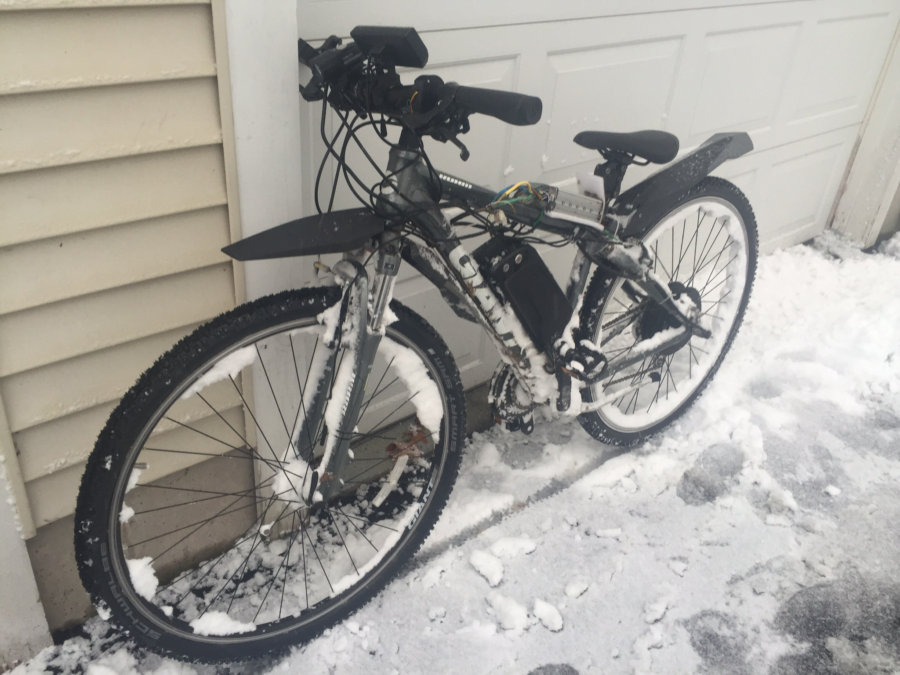
This was my second Ebike build, based on a Giant Roam “hybrid” that we had purchased a few years before. We had gotten a child seat so my young son could ride with us, but we didn’t have a bike with the necessary mounting points. At the time, I wasn’t ready to go back into mountain biking, so we settled for this bike at a price point of $550 or so.
I ordered another Mac motor kit from em3ev, and another slightly larger 52V triangle battery with high performance Samsung 25r cells. The triangle battery went to my Stumpjumper build as part of its evolution, and the 48V Dolphin pack was earmarked for this Giant Roam.
It had “700c” size wheels, a very low-end Suntour SR NEX suspension fork (with lockout), and direct pull aka vbrakes, not much to write home about. Rather than spend the money on a new bike to convert, I decided to use what I had. Here is the geo, more upright and similar to “older” mountain bike specs:

I did get to experiment with one option that a lot of Ebike enthusiasts swear by, the suspension seat post. Since it was a rigid frame, the conventional wisdom was to get a suspension seatpost, like the Cane Creek Thudbuster to help make it more comfortable. Obviously, it’s just for comfort, unlike real suspension, it does not improve traction.
Thudbuster has a “long travel” (LT) and “short travel” version (ST). I ended up ordering both from Amazon:


Note: like wheels, there are many different “standard” sizes, so you have to get the right one. One approach that I used was to buy a thinner diameter (like 27.2), then get spacers so I could swap between different bikes. This worked pretty well, but now I have mostly full suspension bikes so it’s not as big of a deal. Some have also reported issues when using a spacer where the frame can crack from stress, so something to keep in mind.
The Thudbuster uses elastomers for the actual “suspension”, and you can swap them for different hardness to account for different weight riders. At 160 lbs, I usually work with the default, but you could get a softer one if you’re very light or a harder one if you’re over 200 lbs or so.
“Did it work?“
Yes, I think it does make a noticeable difference, particularly the LT version. Unfortunately, the LT version requires additional exposed seatpost length, and my hardtail frames were older designs where the seatpost came up fairly high because of the top tube. I could not really ride the Stumpjumper with even the ST version, and I could only use the ST version on the Giant Roam. In 2018 I got my daughter a Commencal Junior HT with a much lower seatpost setup, so we use the LT seatpost on her bike. Check out the pic below to see how different the frame is setup (long/low top tube, short chain stays, somewhat slacker head tube, etc.).

Now that I had a newer bike, I also took the opportunity to learn how to install disk brakes. Surprisingly, the Roam didn’t have rear mounts for disks, but I was able to install new brakes in the front.
I went with Avid BB7 Brakes from Amazon

Note, you’ll also need brake cable kit, I used the Jagwire Ripcord kit after reading a few reviews, also from Amazon.

But then you’ll need a good set of crimpers and wire cutters, so I went back to Amazon for the Jagwire Pro Cable Crimper

Finally, you’ll need some brackets and the actual disk rotor. You’ll need to figure out what brackets go with the rotor you want to use. Since this was a low-end bike, I just stuck with an Avid 160mm rotor. On my 72V EEB, I stepped upto 200mm rotors. Mostly this helps with heat dissipation, such as on long downhills. Like cars, most of the braking happens in the front so often people run a larger rotor there vs the back.
Avid 160mm rotor from Amazon

With the proper tools, it was pretty easy to install the disk brakes. I wound up installing the same set on my 72V EEB, but later I’ve started going with Shimano hydraulics. The hyrdaulics have better “feel”, although they do require more maintenance, such as bleeding them.
Another thing I go to try with this bike was to make it a single speed in the rear. Since I had decided on a right hand half twist throttle, there was limited space on the right side of the bars which had: rear brake, rear shifter, throttle, etc. I tried an unorthodox setup of removing the rear derailleur and just keeping the front derailleur to switch between the 3 front chainrings. Removing the rear derailleur made the chain not want to stay on, so I experimented with a few “tensioners” to help prevent this. The one that worked best was this expensive, but well made and designed Paul Melvin Chain Tensioner from Amazon. Even though it cost a lot, I ended up wasting more than the cost on a few other tensioners I tried that didn’t work for me.

This setup worked ok, and since I had the motor, there was decent gearing just using the 3 front chainrings. At the time, I didn’t want to get into the seemingly more complex 1x setups, but I ended up going that way eventually with my analog mountain bikes as well as my mid-drive setup. The front derailleur is clunky and shifts slow, so it seemed like an ok idea at the time, but I get why people don’t do this more often…
The 700c tire size was pretty limiting, I wanted to get some wider off road tires, but they weren’t really meant for these wheels or the frame. I did ride it on the trails, but it was not in this bike’s wheelhouse. I ended up selling the Giant Roam for $500 to a friend, not much of a business for me to sell bikes since I spent more than that on the Ebike kit and new parts… It was a good learning experience and I had a few more bike tools in the garage and mechanical skills under my belt.
Ebike Nerd built this blog with WordPress on AWS Lightsail. Ebike Nerd wanted an opportunity to try some AWS Components including Route 53, SES, and S3. Subscribe to get email updates when we post new content and please let me know if you have any questions or other feedback.
| Disclaimer: There are affiliate links on this site and I may receive compensation if you use a link and make a purchase. I only reference products that I have used or if someone I trust has recommended them. Product reviews and information on this site are meant to provide food for thought, not professional advice. I share my experiences to show what worked so far and what didn’t, YMMV. Please check your local laws to make sure you are in compliance, or at least don’t get caught! |