
| Battery | 48V Dolphin Pack from em3ev.com |
| Controller | 20A Infineon (1000W) |
| Motor | Rear Mac 8t geared hubmotor |
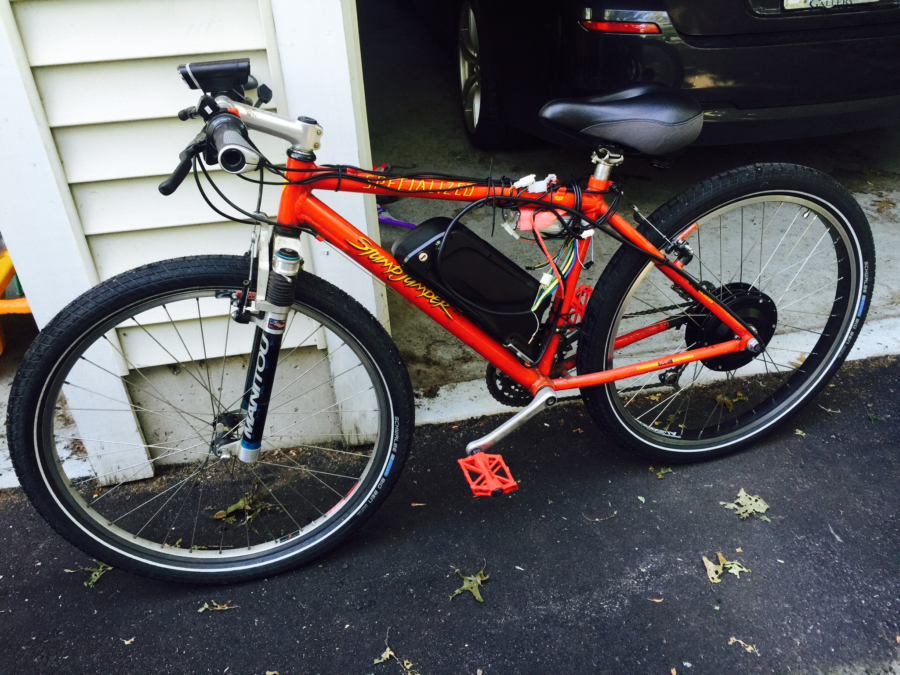
This is the original build for my Vintage (1992) Specialized Stumpjumper converted to a geared hub Ebike, the one that started it all. It’s not much to look at and my friend called the wiring a “Rat’s Nest”. This is true, I love to work on projects like this, but my mechanical skills are “limited”. There is a learning curve and I am getting better at it, this bike went through a bit of an evolution.
My first build used parts supplied by em3ev.com back in 2015. I was referred to em3ev by research on the technical Endless Sphere forums and the ElectricBike.com website. em3ev was started by an English ex-pat that moved to China, which is where many of the Ebike vendors reside. I went with them, since there seemed to be a lot of other shady websites selling vaporware, so I wanted to go with a site that had a good reputation..
em3ev offered kits so I needed to make several choices:
- Motor Placement
- Front or Rear
- Mac Geared Motor Type
- 6t, 8t, 10t, or 12t
- Fewer turns = more top speed
- More turns = more torque
- Wheel diameter
- I could match the 26 inch donor bike, or maybe go smaller for more torque
- Battery
- How much voltage? (48V or 52V)
- Pack or Frame Mounted
- What kind of cells?
- Different cells can handle higher current or more amps (A)
- If your cells are not high enough quality, you get more “voltage sag” where the output will go down trying to meet the current draw. This will impact power output (in watts W)
- Controller
- They offered Chinese Infineon controllers pre-programmed to different amp (A) ratings. The controller have different quantity and quality of “Field Effect Transistors” (FETs) to control the current. Having more and/or better FETs allows running more A, if you’re battery and motor can support it.
My previous experience with micro (1:24 scale) RC cars like X-Mods and mini-z helped with some of these concepts, but dealing with much larger batteries (52V vs 7.4V or less).
I ended up going with the following options.
| Choice | Option | Comments |
|---|---|---|
| Motor Placement | Rear | Front hub + pedaling for AWD sounded cool, but decided to stick with rear |
| Mac Motor Type | 8t | Target speed 25 mph Below my 30 mph target |
| Wheel Diameter | 26″ | Match the donor bike |
| Battery | 48V Dolphin | At the time, best option for a frame-mounted battery |
| Controller | 20A Infineon | Start with a less power option |
Cost Breakdown was as follows:
| Description | Cost |
|---|---|
| em3ev Upgrade Mac Kit | $788.00 |
| Shipping | $227.50 (!!) |
| Paypal Fee | $37.57 |
| Grand Total Shipped | $1,053.07 |
Did I mention that shipping from China is expensive, and shipping batteries is very expensive too?
Now that I had ordered the kit, I read lots of articles, tutorials, and reviews to figure out how to actually do the conversion. I had ridden all kind of bikes since I was in elementary school, but for the most part I was clueless in wrenching on them. I always had a family member (my uncle), or riding buddies that essentially did all the work for us. When I got into mountain bikes, we befriended the guys at Cycle Loft in Burlington, MA, and they would adjust our gears and brakes before every ride. As part of building and maintaining various Ebikes and mountain bikes, I eventually learned how to do this myself.
Another crucial element I knew I would need was a “torque arm”. This is a device to help spread the load from the hub motor and offset the twisting force of the motor in the dropout. Until I got a wheel with a hub motor in my hands, I found it hard to picture. Basically, the hub is an electric motor, so when you bolt it to the frame, it twists which rotates the wheel. The forces had been known to lead to catastrophic failure, particularly in front hub motor builds. This is the main reason I went with a rear hub build. The idea of a front hub motor so I could get “AWD” by pedaling definitely appealed to me on paper. After riding rear hubs, I know a front motor hub would not work for me to have all that unsprung weight in the front. They also did not recommend using a front hub motor with a suspension fork, and I knew I wanted to step up to full suspension as I learned about the modern mountain bike technology.
I went with torque arms from Grin technologies, a reputable Ebike company based in Canada. There were other types that were basically extra material that was epoxied to the existing dropout to make it beefier, but this bolt-on approach made more sense to me. The TorqArmV4 is available on Amazon for quick shipping in the US and is meant to be used for a rear hub motor.

When it all came together, I took it for a maiden voyage and I was very apprehensive. Since I was running a 48V battery @ 20A, it was almost 1000W, about 1.3HP (roughly 750W/HP), which doesn’t like a lot. Since the bike was so light, it was enough to get it going pretty good. For the first several rides, I would pull over constantly to make sure the wheel hadn’t gotten loose. I had read a few horror stories where a guy was going along at 30 mph when the wheel just fell off or the frame snapped, either of which would ruin your day. It took time for me to have confidence. The sensation and outdated brakes and no suspension made it feel like I was flying, even at 25 MPH. I was kind of glad I hadn’t reached my original goals of 30 or 40 MPH.

I focused on the actual conversion, but also changed a few things on the bike itself:
- New cheapo platform pedals, didn’t think it would be a good idea to clip into a potential death trap
- Added some battery powered lighting
- Added Schwalbe 2 inch “balloon” balloon tires with heavy duty tubes
- The wires ran through the axle on the Mac motors, so it was a PITA to change the tire once it was mounted
- A comfy padded seat to replace my Specialized saddle with Ti rails
I experienced one of the benefits of a hub motor on one of my early rides. I was bombing along one of my favorite trails that had these berms built up by the dirt bikes. I loved to lean into the turns and transition from one to the next. As I was doing this, I caught the derailleur on a rock and knew something bad had happened. I could heard the chain hitting the spokes and realized that the derailleur had snapped!

This is also a good picture of the Torque arm too. You can see how it’s braced against the seat stay with hose clamps to counteract the twisting from the motor. The part where the axle is inserted shaped the same as the axle to keep it locked together.
Anyway, I was several miles from home in the middle of the woods. If I had an analog bike or a mid-drive setup, I would be dead in the water and setup for the “walk of shame”. With the rear hub motor, the wheel could still spin just fine. I just needed to tie the derailleur to part of the frame with chain to keep it out of the way, and I was able to zip home.
I rode my new Ebike and got more comfortable with it. It takes a little getting used to with the added gyroscoping effect with the wheels. Also, I needed to rewire my brain to adjust for the added speed and also convince myself that I could power up hills and obstacles in some cases, even if it didn’t look like it.
I liked it so much, I decided to build a second Ebike based on a Giant Roam hybrid. I switched the Dolphin pack to that build and got a high performance 52V triangle pack with Samsung 25r ($699) cells and battery bag from em3ev for the Stumpjumper. I also upgraded the controller to a 12 FET 40A Infineon controller. With 52V and 40A, I was now over 2100W, or around 3HP! Check out the videos page for a run after the new parts were installed. It was noticeably quicker top-end and in acceleration.
I didn’t address any other shortcomings, but the battery bag allowed me to clean-up the appearance somewhat. Still ugly though.

I continued to research how much mountain bike technology had advanced, so I needed to try it for myself. I purchased a 2016 Giant Stance 2 entry level full suspension trail bike with 4 inches of travel . I LOVED it and went to a few singletrack hotspots near me. I realized how awful my Stumpjumper was, and then I decided to built another Ebike with the updated tech. The Stumpjumper journey wasn’t done yet though.
Ebike Nerd built this blog with WordPress on AWS Lightsail. Ebike Nerd wanted an opportunity to try some AWS Components including Route 53, SES, and S3. Subscribe to get email updates when we post new content and please let me know if you have any questions or other feedback.
| Disclaimer: There are affiliate links on this site and I may receive compensation if you use a link and make a purchase. I only reference products that I have used or if someone I trust has recommended them. Product reviews and information on this site are meant to provide food for thought, not professional advice. I share my experiences to show what worked so far and what didn’t, YMMV. Please check your local laws to make sure you are in compliance, or at least don’t get caught! |